Wednesday, August 23, 2017

Part 3 - The basic Block

I wonder how you went with your flower blocks?  Sorry I'm a few days late getting this out - bit of trouble with photos downloading .......hmmmmmm
I've been busy working on both the flower blocks
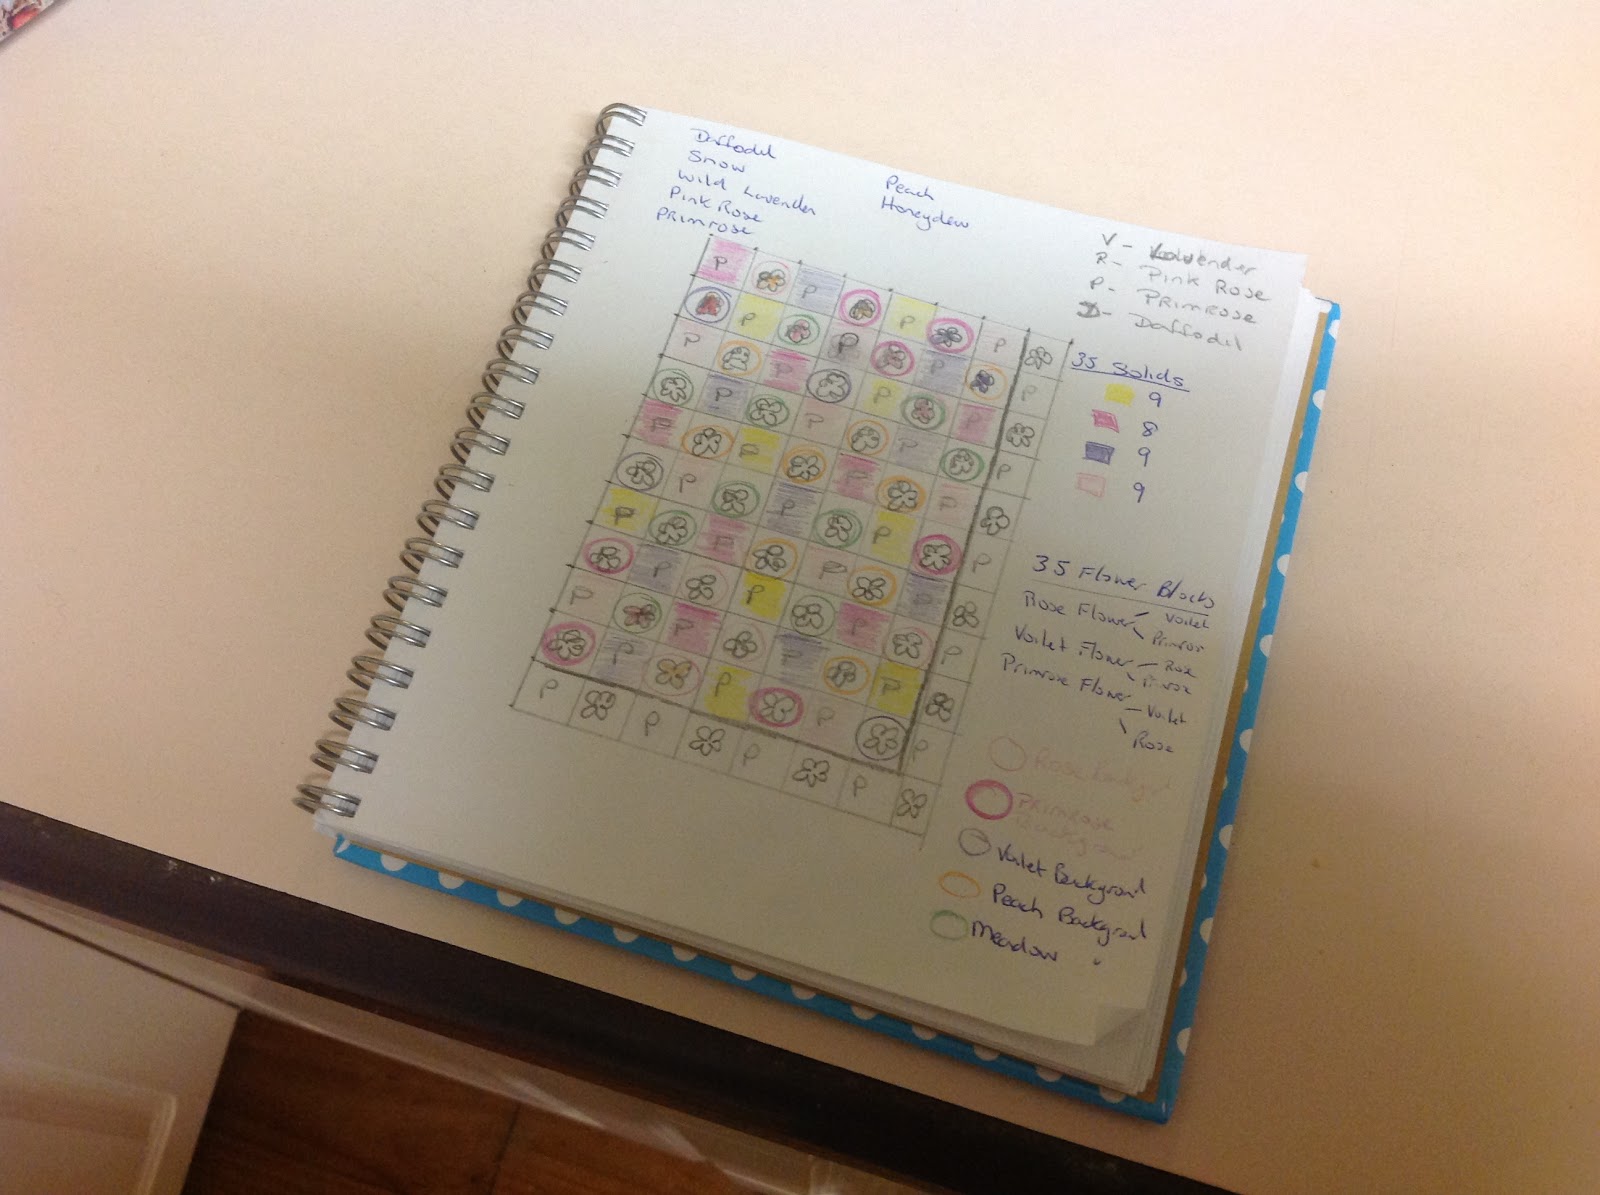
and the plain blocks so I can make up rows.  I find it very rewarding to make all the blocks for a row at a time and then crochet them together to see a whole row complete!  Before joining them together, I lay out the first couple of rows which helps me to work out what balance of colours I want.  Even though I have that initial design layout in my notepad, I haven't added what colour the flower petals will be, so laying them out helps to spread the colours around!  You might also notice that now that I'm down to row 4, I've changed a couple of the blocks around - its all about getting a nice balance with the colours.  Of course if I'd just stuck with one colour for the flowers and one or two colours for the background, that would have made it somewhat easier and a little quicker lol.  I think it took me a good couple of hours on the weekend deciding just how that row 4 was going to look!  You will find the pattern I'm using for the plain blocks below.  I've had to change it up a bit so that it would end up the same size as the flower blocks.

I really am loving the Bendigo Cotton - such a lovely drape and nice amount of softness to work with!

When joining the blocks together I place the 2 right sides together and then use a dc stitch to join them together. I crochet in as many loose ends as I can so that there will be fewer to do at the end of the quilt!  Each finished block should have 20 treble stitches on each side making them easy to join together.You'll notice the plain blocks are a different pattern which I needed to adapt to make them the same size as the flower blocks - make sure that once you finish your colour rounds the first border round (white in my case) is made using dc (or sc for US terms), first and then follow with a treble row right around.  

The Flower Garden Plain Block : (please note this is an adaptation of the granny block)
Start with 4ch and join with ss.
Working out of the ring  for Row 1:    3ch, 2 tr; 2ch, 3tr; 2ch, 3 tr; 2 ch, 3tr. join to the top of 3ch with ss before beginning each new round when using the same colour thread I work a ss back into the loop just made.
This is after  the 2nd row round - see the ss to get back to the loop

Row 2: 3ch  2tr, 2ch, 3 tr ( first corner,) 2 ch,  group of 3 tr, 2 ch 3 tr into each of other 3 corners
Row 3 & Row 4: On this row do the corners the same, but only 1ch between the corners and the spaces for the middle group of 3 trs   
At the end of row 4 you should have the corner groups and 2 groups of 3tr between them. Cut your coloured yarn and attach the white yarn anywhere along an edge.
Ch 1, dc into the tops of the trebles along the edge - do not make stitches in gaps between the groups of trebles, but do ensure you work all the way from corner to corner. At the corner loops 2 dc, ch 2, 2 dc.  You should have 16 stitches from corner to corner along each side. (3 for each group of trebles on previous row = 12  + the 2 extra in each corner you just made) Do not cut yarn ...
Final Row: ch 3, treble into each stitch along the edge with corners being 2 tr, 2ch, 2 tr. You should now have 20 stitches from corner to corner (the same amount as the flower blocks). 
I haven't written patterns for anyone before so if this needs better clarification please ask! Again this pattern is taken from numerous other granny blocks that have been around since the dawning of time and I have adapted it to fit my needs.
You should now have a lovely bordered plain granny to go between your flowers.  I hope you are enjoying this as much as I am!


Saturday, August 12, 2017

Part 2:Getting Started - Crocheted Flower Garden Blanket Along

It's Saturday here, and as promised I have the info ready for you to join me at the kitchen table for a cuppa and some crochet!  I need to stress these are Not my patterns, the granny square has been around for years with various variations and this lovely flower pattern is a free pattern called  Flower Garden Granny Square by Hiromi Widerquist . Her original pattern is in Japanese and her "English" version in US terms . However I tend to use UK terms so I'm copying it to here in UK terms (and I have some slight changes to her original pattern). See below for the pattern. It's up to you how you want to make up your blanket, however I want all yellow centres so I've made up a few centres to have ready to build the flowers.
 

  I've decided to have different coloured flowers and backgrounds, but you might choose to make all your flower blocks the same colours. 

Remember you will be putting plain blocks in-between each of the flowered blocks so take this into account when planning your colours. 
When I put up the next post you'll notice the plain blocks are a  different pattern which I've adapted to make them the same size as the flower blocks , so remember to watch out for this.

Okay, so there you go, have some fun and don't forget to let me know when you've made some so I can come and have a look.  Can't wait to see all the different flower blankets/ cushions that develop.   Have fun!
hugs Sharm
Linking in with Wool on Sundays


The Flower Block:
Row 1: (yellow centre)- ch 4, join with a ss to form a circle. *dc, ch 4 in loop* do this 8 times.  cut yarn
Row 2: (Petals) - Join your petal colour in any 4ch loop. In each loop *ss, ch 3, 2tr, 3 ch, ss,ch 1*
Repeat * * in each loop and finish with a ss into the top of the 1st dc.  cut yarn.
Row 3: (I've used white here for each of my flower blocks so the petals stand out - the actual pattern refers to this section as the leaves)- Join your new colour with a dc in the ch between any two of the petals.  Work * ch 4 behind each of the petals, dc in each ch 1 space between petals*  continue *  * all the way around finishing with a ss into 1st dc.  Do not cut yarn
Row 4: With same colour ss into the next ch 4 loop. Ch 3, 2 tr, ch 2, 3 tr in same loop. This makes the first corner of the square. *3tr into next loop ;  then 3tr, ch 2, 3tr in next loop (corner). *  Repeat * * around until you have the 4 corners done. 3tr into next loop.  ss into top of 1st 3ch.  Cut yarn.
Row 5: (your background colour) - Attach colour to any corner space, work 1st corner (ch3,tr 2, ch 2, tr 3).  *3tr groups in each space between the 3 tr groups of previous row, across to next corner. Work 3 tr,, ch2, 3tr (corner)*.  Repeat * *to complete the row and ss into top of 1st 3ch.
Here is where I've altered the pattern -   Row 6: using the same colour from previous row work 1 tr in the top of each previous tr stitch all the way around.  When you get to the corners 2 tr, 2ch, 2tr.  You should have a total of 16 stitches from corner to corner.  Cut the yarn
Row 7: Change to your border colour and repeat row 6. You should now have 20 stitches on each side of your block.

Wednesday, August 9, 2017

Crochet Flower Garden Blanket Along


I'm making a flower garden crocheted blanket for my granddaughter Jacey for her birthday in October. As I mentioned in the previous post, I thought there might be some of you who would enjoy crocheting along with me to keep me company.  You might decide to make a cushion cover with just a few blocks rather than a whole blanket, but you will be surprised just how quickly these little blocks multiply and become rather addictive lol!

Here is my "plan" - I've decided to leave out the last row as I think with borders that 7 blocks across and 10 blocks down will work fine!  That gives a total of 35 plain blocks and 35 flower blocks! 


The blocks each measure approx. 5 1/2 inches with the borders, so this might help you get a rough idea of the size you want.


I've decided to use 4 main colours with 2 extra colours for variation.  I'm using 8ply (dk) cotton (since my granddaughter lives up the top of Australia where it is quite hot for most of the year).
You could easily use another type of yarn or stash dive for whatever you have on hand!  If you want to know just what I'm using, its Bendigo Woollen Mills Cotton in Snow, Daffodil, Wild Lavender, Pink Rose, Primrose, Peach and Meadow.  Snow is being used to edge each block and join them together, and it also sits in behind each flower.  I think the white makes the flowers "pop".  All my flower centres will be yellow (daffodil), however I plan to change the flower colours as well as the background colours to make a lovely bunch of flowers! 

I'll leave you to go stash diving or decide on colours and gather all your supplies together!  You might want to dedicate a special basket for this project so its easy to pick up and work on.  I'll be back on Saturday with the pattern and a cuppa to sit and crochet together  ............
Thanks to those who have emailed me to say they might be joining in!
Hugs Sharm

Tuesday, August 8, 2017

Rainy Weekend

We had quite the rainy weekend here, even getting some sleet during one of the storms that passed through! We haven't had sleet here in the 7 years we've lived here, but apparently the mountains got a metre of snow during that storm so I guess it's no wonder we got something icy here!  With FNWF on Friday the table soon began to fill with projects ....... Friday morning. I finished off the cushion covers for Son and DIL birthdays and parcelled them up and took them into the post office, so they are in transit between here and Townsville!  
They ended up with 4 covers and I have 2 more to make them to complete the set ( hopefully for the

anniversary in September ......otherwise Christmas which will merge the 2 colour schemes together).    By the way, Jax loved his birthday blanket (hard to believe our youngest grandson turned 7!), made with the colours that he had chosen from the Bendigo Mills Website.  My DIL took a photo of him the next morning as he dragged his blanket out with him to sit and have breakfast - made my heart melt!  It makes all the time spent making it worth while when you see it appreciated like that!
Next I got to work on the Rabbit Hole BOM which I'm behind in after struggling with those houses to build the village! I'm working on the suns to go in each corner next to the houses and managed to get 3 completed with 2 actually attached. Patterns get released on the last day of each month so I think I'm currently working on the May block - hoping to get caught up or close to it by the end of August before the next one is released.

Just before the front was joined .....
And whats a little sewing without a bit of knitting ...... a couple more rows of my Sleepy Hollow jumper (sweater for all you US gals), and the front is now joined together .......  its a slow work in progress this one since I have so many other projects currently on the go.  I would really love to be wearing it right now, but in reality I think it will more likely be next winters apparel!
 
By this time you might say the weekend was moving on and with it the table became a little full with all the things I was working on ..........  So with the cushion covers in the post it was time to get working on Jaceys ( granddaughter) birthday blanket. Her birthday is the start of October.  I've had to sit and draw up a bit of a plan to get an idea of how it might look and how many blocks I'll be working on  ....... around 70 by looks of things with some plain and some flowered.  
I'm using a plain granny square in between a flowered granny for this blanket.  By the time the squares are joined and I do the border, it should be pretty close to a single bed size!  I'm using all Bendigo Woollen Mills 8ply Cotton for this and using a 4mm hook.  The pattern is a free one - perhaps you'd like to join in with me and keep me company while I do this blanket? If so you might like to start thinking about the colours you will use - I'm using 7 colours on this, but you could use as few or as many as you like!   As I said I'm using Bendigo Cotton as I love the drape it gives, the large 200gr ball and the bonus of its price!  My colours are:  daffodil, Snow, wild lavender, pink rose, primrose, peach and honeydew.  Snow will be the edges of each square and the joining colour.  Details on this blanket will be here later in the week for anyone wanting to join in the fun ......

Till then have a great week!
Joining in with Wool on Sundays and FNWF